sabato 5 novembre 2022

ODI 12c - How Is It Possible To Restrict ODI User Access To Projects and Models?

Oggi vediamo la security di ODI  che permette di limitare gli accessi agli utenti ai vari oggetti di ODI. Supponiamo di dover:

  1. Limitare l'accesso ad un progetto 
  2. Limitare l'accesso ai model che contengono gli odidatastore
Come primo step creiamo un utente a cui permettere di visualizzare un solo progetto ed un solo folder.


Una volta creato l'utente TEST_AP questo risulta essere presente su ODI ma senza alcun privilegio compreso quello di CONNECT, quindi se proviamo a connetterci avremo un errore.


A questo punto occorre aggiungere all'utente i relativi profili di sicurezza presenti su ODI tra cui CONNECT affinchè si possa connettere ad ODI.


Assegnato il profilo CONNECT l'utente riesce a collegarsi ad ODI ma non vede nulla di quanto presente sul Work Repository.


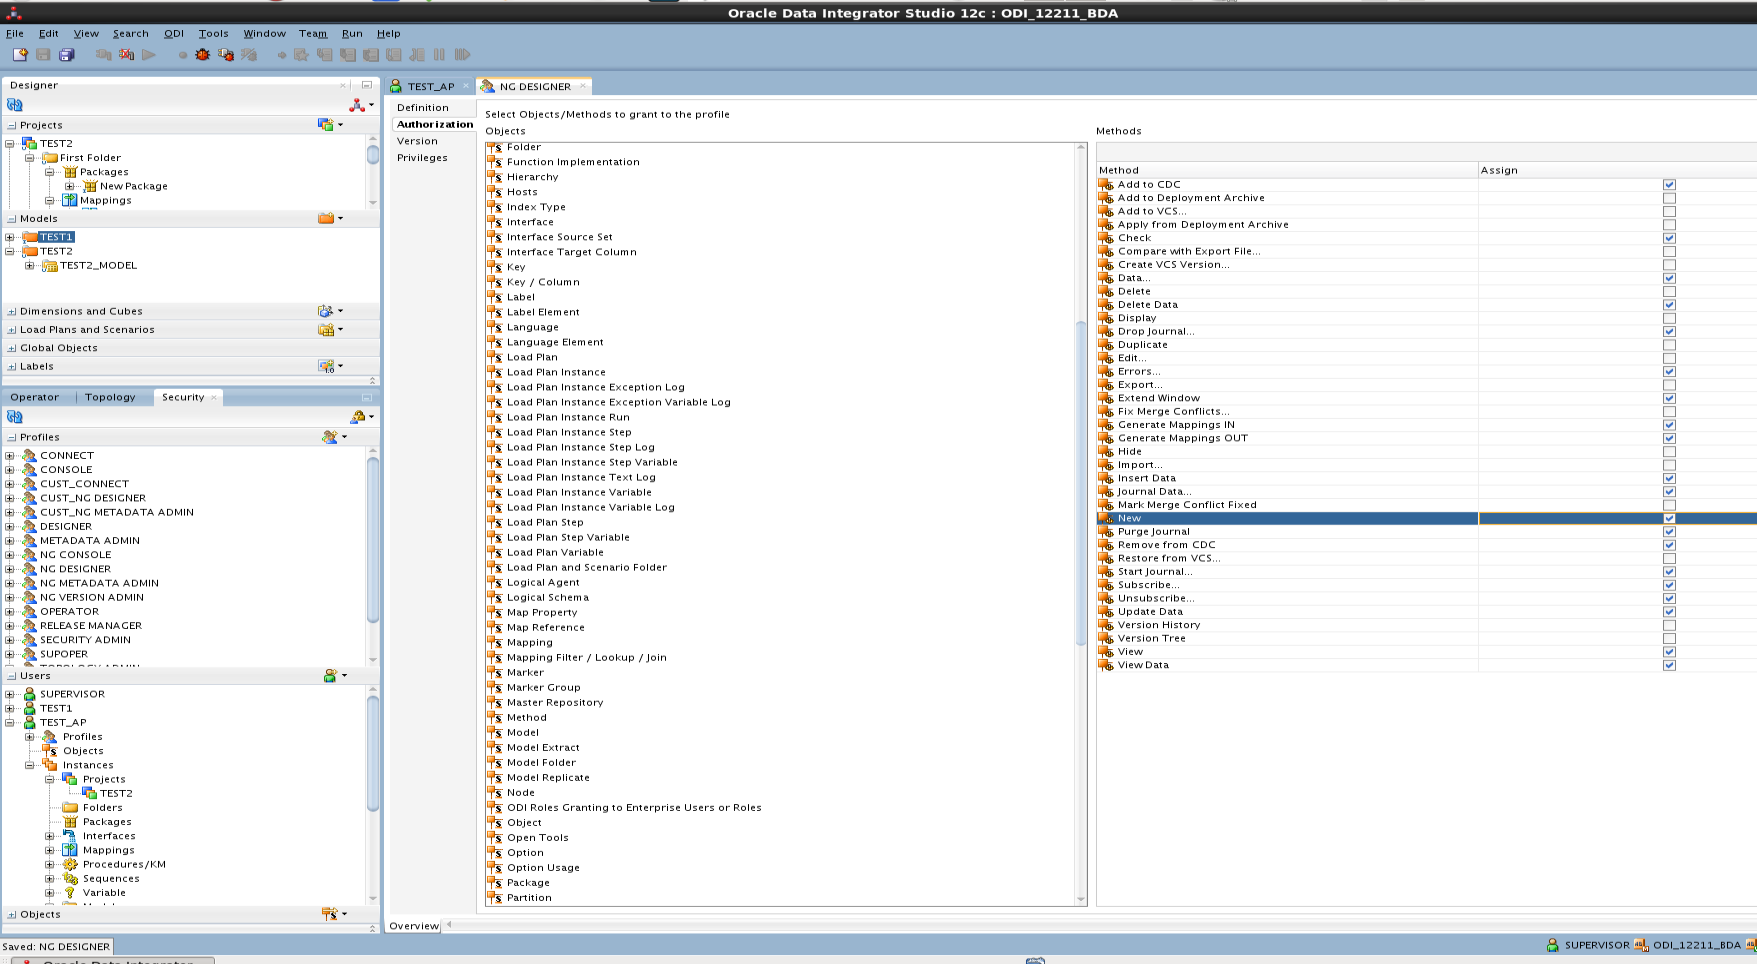
A questo punto affinchè l'utente possa vedere quanto presente nel designer occorre associare i corretti profili. Per permettere la visualizzazione di un progetto occorre assegnare il profilo NG_DESIGNER che rispetto al profilo DESIGNER presente una serie di limitazioni.

Partiamo da quanto presente sul WorkRepository e facciamo in modo che l'utente creato TEST_AP visualizzi solo quanto presente nel progetto TEST2.


Assegnamo all'utente TEST_AP i profili NG_DESIGNER ed NG_METADATA_ADMIN


Una volta applicati all'utente i profili scelti effettuiamo un DRAG del progetto da selezionare sull'utente TEST_AP ed a questo punto nel momento in cui applichiamo le modifiche si aprirà un pannello con tutti i privilegi associati al progetto TEST2 da associare all'utente TEST_AP selezionato.


A questo punto selezioniamo le grant necessarie e se ci ricolleghiamo con l'utente TEST_AP avremo presente nel DESIGNER il progetto scelto.


Per assegnare i modelli occorre effettuare un drag del modello sull'utente cosi come avvenuto per il progetto ed anche in questo caso si aprire una finestra con tutte le grant associate al Model e da associare all'utente TEST_AP.


Se ci colleghiamo con l'utente TEST_AP questo è quanto visualizzeremo nel DESIGNER:


Tuttavia  anche se visualizziamo il progetto con i relativi Packages e Mapping e Modelli non possiamo crearne di nuovi in quanto non abbiamo le necessarie grant.


Per creare nuovi mapping o odidastore occorre modificare le grant presenti nei profili assegnati. 


Da quanto indicato sopra si evince che per la definizione precisa di grant occorre purtroppo visualizzare i vari profili o crearne di nuovi ma tuttavia occorre per forza definire prima tutte le grant e poi associarle ai vari utenti. Questo significa creare dei profili ad hoc da assegnare ai vari utenti, magari duplicando quelli originali messi a disposizione da ODI. Occorre però tenere presente che in caso di Upgrade i profili custom non verranno aggiornati:


Di seguito alcune note ODI da visionare prima di effettuare modifiche ai vari profili di sicurezza:
  • NOTE:423677.1 - How Is It Possible To Restrict ODI User Access To Projects and Models?
  • NOTE:423787.1 - Setting Up ODI User Privileges On Folder Objects
  • NOTE:424351.1 - How is it Possible to Inhibit ODI Users From Reverse Engineering Specific Models?
  • NOTE:424530.1 - How To Manage Access Authorizations On Object Instances In Different ODI Work Repositories
  • NOTE:424664.1 - Restricting Privileges to Users and Contexts in ODI with Security Manager
  • NOTE:823783.1 - Frequently Asked Questions Concerning ODI Users, Roles Credentials and Security


giovedì 16 giugno 2022

BIAPPS - INFORMATICA - Query per estrarre l'associativa Workflow / Mapping di Informatica

 Di seguito una query per poter associare i workflow ai mapping eseguiti in Informatica.

Tutto internamente ad Informatica:


-------------------------------------------------------------------

--- QUERY ESTRAZIONE associativa WF_MAPPING in INFORMATICA      ---

--- Da eseguire come utente sys sul database che contiene il repository di INFORMATICA   ---

-------------------------------------------------------------------

SELECT distinct 

        SUB.SUBJ_NAME subject_area_info ,

        WF.WORKFLOW_NAME, opb_task.TASK_NAME task_name_info,     

        OPB_TASK_INST.INSTANCE_NAME ,MAP.MAPPING_NAME

        ,MAP.MAPPING_ID, opb_task.IS_VALID,    opb_task.IS_ENABLED,

        OPB_OBJECT_TYPE.OBJECT_TYPE_NAME TASK_TYPE_NAME

    FROM

        INFA.OPB_TASK_INST, 

        INFA.OPB_OBJECT_TYPE, 

        INFA.OPB_TASK, 

        INFA.REP_WORKFLOWS WF,

        INFA.OPB_SUBJECT SUB,

        INFA.OPB_SESSION SESS, 

        INFA.OPB_MAPPING map

    WHERE

        OPB_TASK_INST.TASK_TYPE = OPB_OBJECT_TYPE.OBJECT_TYPE_ID

        AND OPB_TASK_INST.WORKFLOW_ID = OPB_TASK.TASK_ID

        AND OPB_TASK_INST.VERSION_NUMBER = OPB_TASK.VERSION_NUMBER

        AND OPB_TASK.IS_VISIBLE = 1

        AND WF.WORKFLOW_ID=OPB_TASK_INST.WORKFLOW_ID 

        AND WF.SUBJECT_ID=SUB.SUBJ_ID 

        AND OPB_TASK.SUBJECT_ID=SUB.SUBJ_ID

        AND SUB.SUBJ_ID=WF.SUBJECT_ID 

        AND OPB_TASK_INST.TASK_ID=SESS.SESSION_ID 

        AND MAP.MAPPING_ID=SESS.MAPPING_ID

        AND MAP.SUBJECT_ID=WF.SUBJECT_ID

        AND MAP.IS_VALID=1


giovedì 21 aprile 2022

RDBMS - Funzioni per criptare e decriptare una stringa

Di seguito un paio di funzioni per criptare e decriptare un testo.

Gli algoritmi utilizzati sono : 

A =DES3_CBC_PKCS5  D =ENCRYPT_AES256 +CHAIN_CBC +PAD_PKCS5;

Di seguito le funzioni:

--------------------------------------------------------------------------------

--- funzione per cifrare un testo

--- ALGORITMO = 

---    A =DES3_CBC_PKCS5

---    D =ENCRYPT_AES256 +CHAIN_CBC +PAD_PKCS5;

--- ES: select pkg_gest_plsql_odi.cifra('Questo è un testo molto lungo da cifrare, contiene anche ritorni a capo etc...',  'MIACHIAVE012345678901234','D') cifrato  from dual;

---------------------------------------------------------------------------------

 function CIFRA(in_str in VARCHAR2, 

                                 chiave in varchar2, 

                                 Algoritmo in char) 

                  return RAW is

 raw_da_cifrare RAW(2048) :=  UTL_RAW.CAST_TO_RAW(CONVERT(in_str,'AL32UTF8','WE8MSWIN1252'));

 raw_chiave     RAW(128) := UTL_RAW.CAST_TO_RAW(CONVERT(chiave,'AL32UTF8','WE8MSWIN1252'));

 alg           PLS_INTEGER;

 v_err varchar2(4000):=null; 

BEGIN

 if Algoritmo = 'D' then

    alg := sys.DBMS_CRYPTO.DES3_CBC_PKCS5;

 elsif Algoritmo = 'A' then

    alg := sys.DBMS_CRYPTO.ENCRYPT_AES256 + 

           sys.DBMS_CRYPTO.CHAIN_CBC + 

           sys.DBMS_CRYPTO.PAD_PKCS5;

 else    RAISE_APPLICATION_ERROR(-20001,'Algoritmo non previsto, scegliere D o A!');

 end if;

 return dbms_crypto.Encrypt(raw_da_cifrare, alg, raw_chiave);

EXCEPTION

      WHEN OTHERS THEN

        V_ERR:='Errore => '||SQLERRM;

         RAISE_APPLICATION_ERROR(-20002,V_ERR); 

END CIFRA;

--------------------------------------------------------------------------------

--- funzione per decifrare un testo

--- ALGORITMO = 

---    A =DES3_CBC_PKCS5

---    D =ENCRYPT_AES256 +CHAIN_CBC +PAD_PKCS5;

-- ES:   select pkg_gest_plsql_odi.decifra('DC84F4C1CA98FC27208C3A5013F0A88720DCCE5E5C1E250ADD38352404F3CB73E6C4A97DE64E999997B43F5531EAE824D6A2EA7AC5EE78BF5DBC3CCB86CC131B89CBADD7295D71DBE57B7CDC1DFE3787',     'MIACHIAVE012345678901234','D')   from dual;

 function DECIFRA(in_raw in RAW, chiave in varchar2, Algoritmo in char) 

                  return VARCHAR2 is

 raw_chiave     RAW(128) :=   UTL_RAW.CAST_TO_RAW(CONVERT(chiave,'AL32UTF8','WE8MSWIN1252'));

 raw_decifrata  RAW(2048);

 alg            PLS_INTEGER;

 v_err varchar2(4000):=null; 

BEGIN

 if Algoritmo = 'D' then

    alg := DBMS_CRYPTO.DES3_CBC_PKCS5;

 elsif Algoritmo = 'A' then

    alg := DBMS_CRYPTO.ENCRYPT_AES256 + 

           DBMS_CRYPTO.CHAIN_CBC + 

           DBMS_CRYPTO.PAD_PKCS5;

 else

    RAISE_APPLICATION_ERROR(-20001,

                 'Algoritmo non previsto, scegliere D o A!');

 end if;


 raw_decifrata := dbms_crypto.Decrypt(hextoraw(in_raw), alg, raw_chiave);

 return CONVERT(UTL_RAW.CAST_TO_VARCHAR2(raw_decifrata),'WE8MSWIN1252','AL32UTF8');

EXCEPTION


      WHEN OTHERS THEN

         V_ERR:='Errore => '||SQLERRM;

         RAISE_APPLICATION_ERROR(-20002,V_ERR); 

END DECIFRA;

--------------------------------------------------------------------------------

Occorrono per funzionare logicamente le grant sul package DBMS_CRYPTO di sys.

lunedì 11 aprile 2022

RDBMS ORACLE 19c - Increasing the Maximum Size of VARCHAR2, NVARCHAR2, and RAW Columns in a PDB

Sulle nuove versioni del DB Oracle è possibile portare le dimensioni di alcuni Datatypes al limite massimo consentito, ad esempio le Tabelle possono avere i campi di tipo VARCHAR2 non più come limite massimo 4000 ma ad esempio 32k.

Per poter effettuare questa modifica però occorre settare il seguente parametro:

  • MAX_STRING_SIZE = EXTENDED

Di seguito viene indicato come attivare questo incremento di Maximun Size all'interno di un Pluggable DB.

Per incrementare la dimensione massima di una colonna con Datatype VARCHAR2, NVARCHAR2 o un RAW in un Pluggable DB effettuare i seguenti passi:

  1. Shut down the PDB.
  2. Reopen the PDB in migrate mode.

Note:

The following SQL statement can be used to reopen a PDB in migrate mode when the current container is the PDB:

ALTER PLUGGABLE DATABASE pdb-name OPEN UPGRADE;

  1. Change the setting of MAX_STRING_SIZE in the PDB to EXTENDED.
  2. Run the rdbms/admin/utl32k.sql script in the PDB. You must be connected AS SYSDBA to run the utl32k.sql script.
  3. Reopen the PDB in NORMAL mode.

Note:

The utl32k.sql script increases the maximum size of the VARCHAR2NVARCHAR2, and RAW columns for the views where this is required. The script does not increase the maximum size of the VARCHAR2NVARCHAR2, and RAW columns in some views because of the way the SQL for those views is written.

  1. Run the rdbms/admin/utlrp.sql script in the PDB to recompile invalid objects. You must be connected AS SYSDBA to run the script.

Di seguito alcuni riferimenti:

  • Oracle Multitenant Administrator's Guide for more information about modifying the open mode of PDBs.
  • Increasing the Maximum Size of VARCHAR2, NVARCHAR2, and RAW Columns in a PDB
    • https://docs.oracle.com/en/database/oracle/oracle-database/19/refrn/MAX_STRING_SIZE.html#GUID-D424D23B-0933-425F-BC69-9C0E6724693C
  • Database Reference
    • https://docs.oracle.com/en/database/oracle/oracle-database/19/refrn/MAX_STRING_SIZE.html#GUID-D424D23B-0933-425F-BC69-9C0E6724693C


venerdì 4 marzo 2022

ORA 12c - Oracle Pluggable Database 12c Automatic Startup

SQL*Plus: Release 12.1.0.2.0 Production on Fri Mar 4 08:41:43 2022

Copyright (c) 1982, 2014, Oracle.  All rights reserved.

Connected to:

Oracle Database 12c Enterprise Edition Release 12.1.0.2.0 - 64bit Production

With the Partitioning, OLAP, Advanced Analytics and Real Application Testing options

SQL> ALTER PLUGGABLE DATABASE REPOSORCL OPEN READ WRITE;

Pluggable database altered.

SQL> show pdbs

    CON_ID CON_NAME   OPEN MODE  RESTRICTED

---------- ------------------------------ ---------- ----------

3 REPOSORCL   READ WRITE NO

SQL> alter pluggable database REPOSORCL save state;

Pluggable database altered.

SQL>  select con_name,state from dba_pdb_saved_states;

CON_NAME STATE

---------------   -------------

REPOSORCL   OPEN

SQL> shutdown immediate;

Pluggable Database closed.

SQL> startup

Pluggable Database opened.

SQL> select con_name,state from dba_pdb_saved_states;

CON_NAME      STATE

---------------   -------------

REPOSORCL   OPEN

SQL> exit

Per eliminare lo startupt automatico occorre effettuare la DISCARD dello stato del Pluggable.

DISCARD STATO 

alter pluggable database REPOSORCL DISCARD state;

venerdì 11 febbraio 2022

ODI 12c - Microsoft Dynamics 365

Per poter effettuare l'estrazione di una Entità, account ecc, da Microsoft Dynamics 365 con ODI 12c occorre effettuare prima l'estrazione del Token associato ad una autenticazione OAUTH2. 

La chiamata al webservice purtroppo deve essere divisa in due parti: estrazione del token e successivamente, una volta estratto il Token si può procedere all'estrazione dell'ENTITY richiamando un web services di tipo Rest e generando un file in formato json. 

  • TOPOLOGIA


  • Logical Schema


Logicamente l'estrazione dell'Entità andrà gestita effettuando il caricamento del file estratto in una tabella.

Di seguito il flusso logico del package da costruire per effettuare quanto indicato sopra:


1.Estrazione del token utilizzando l'esecuzione di un comando di sistema operativo, nello specifico si può effettuare un CURL scrivendo quanto ottenuto in un file.
    • curl -v --user "<client_id>:<client_secret>" --data "grant_type=client_credentials" --data "scope=<https://<host>.dynamics.com/.default>" <Endpoint post request per ottenere ilToken> --output "/home/oracle/test_data.txt"

Di seguito i parametri da poter utilizzare per l’endpoint Dynamics 365 Customer Engagement:

·                 Dynamics 365 instance URL: 

·                 Web API: https://<host>.dynamics.com/api/data/v9.0/

·                 client_id = <---->

·                 client_secret = <---->

·                 scope = https://<host>.dynamics.com/.default

·                 Utente applicativo creato: # <user>

·                 Endpoint post request per ottenere il        token: 

             https://<login>.com/<number>/oauth2/v2.0/token 

2. Una volta estratto il Token insieme ad altre informazioni ed inserito in un file occorre tramite un awk script estrarre il solo Token.

[oracle@fmw12c ~]$ cat test_data.txt | awk -v  FS="access_token" '{print $2}'| awk -v FS=":" '{print $2}'| awk -v FS="\"" '{print $2}' >/home/oracle/token.txt

3. Una volta estratto il Token andrà quindi creato un mapping che legge il file e lo inserisce in una tabella.  

4. Caricato il Token in tabella possiamo interrogare quest'ultima, successivamente, con una variabile sql.  


Questa variabile deve essere inserita nella topologia relativa al web_services esposto da D365.

5. Quando si effettua l'esecuzione dell'OdiTools OdiInvokeRest, la variabile viene valorizzata col Token estratto. Il richiamo del webServices Rest effettua lo spool dell'Entità individuata all'interno di un file in formato json.

6. Una volta estratta l'entità il file json deve essere caricato in tabella. Occorrerà quindi creare un mapping per il caricamento del file dati. Logicamente occorrerà prima configurare la Topologia per l'utilizzo di un file complesso, in quanto in formato json. 

Logicamente nell'OdiTools OdiInvokeRest si può inserire un Uri per l'estrazione dell'intera Entità o inserire una qualche condizione di estrazione utilizzando la sintassi di d365.


lunedì 10 gennaio 2022

ODI 12c - Upgrade Procedure ODI 12.2.1.2.6 To 12.2.1.4

Di seguito gli step necessari all'Upgrade del software ODI dalla versione 12.2.1.2.6 alla versione 12.2.1.4.0


STEP

NOTA

Creazione clone macchina DB


Riconfigurazione /etc/hots

1.      Configurazione del file /etc/hosts

Riconfigurazione network DB

1.      Modifica configurazione listener.ora con nuovo <hostname>

2.      Modifica configurazione tnsnames.ora con nuovo <hostname>

3.      Avvio listener

Startup DB

1.      Avvio istanza di database METAINTA

Creazione clone macchina ODI


Riconfigurazione /etc/hots

1)Configurazione del file /etc/hosts

Eseguire riconfigurazione Repository ODI

-

Connettersi al Master Repository


SUPERVISOR/Welcome1$

1.      Modifica URL ODI STUDIO Connection Login INFOBOARD_SVIL con nuovo IP

2.      modificare i puntamenti del workrepository sulla macchina del DB clonato

1.      (Modifica Topology\Repositories\Work Repositories\WORKREP\JDBC\JDBC URL con nuovo IP) 

3.      modificare i puntamenti dell'agent alla nuova macchina ODI clonata

4.      disabilitare tutte le schedulazione dell'agent sulla tabella SNP_PLAN_AGENT

1.      Backup tabella SNP_PLAN_AGENT

2) UPDATE a D :

UPDATE SNP_PLAN_AGENT SET  STAT_PLAN        = 'D';

Riconfigurazione Dominio WebLogic

  • Modificare nel file config.xml  il nome del vecchio Hostname col nuovo clonato
  • Modificare nel file nodemanager.properties il nome del vecchio hostname con quello clonato
  • Eseguire config.sh sostituendo il nome del vecchio hostname db con quello clonato ed il nome del vecchio hostname odi con quello clonato.
  • Al termine delle operazioni di riconfigurazione deve apparire quanto segue:


   Admin Server URL:

        http://<hostname_odi_clone>:7001

Start weblogic

  • cd <ODIDOM>/bin/
  • nohup ./startNodeManager.sh >nmout.log  &
  • nohup ./startWebLogic.sh >out.log  &

Connettersi alla console di Weblogic e test agent ODI

  • Collegarsi alla console :

1.      https://<hostname_odi_clone>:7001/console

0.      Verificare che l'Admin sia RUNNING

1.      Start Managed Server di ODI

Shutdown di tutti i processi Weblogic

1)Stop di tutti i processi weblogic chiudendoli dalla console:

·        https://<hostname_odi_clone>:7001/console

2)  cd <ODIDOM>/bin

·        ./stopNodeManager.sh

3)Verifica dell'assenza di processi java attivi e riferibili a weblogic:

·        ps -ef | grep java

Installazione software ODI 12.2.1.4.0

JDK

FMW 12.2.1.4.0

ODI 12.2.1.4.0

Verifica se il Repository può essere upgradato e stop di tutti i processi


Start the Upgrade Assistant.

(UNIX) ./ua -readiness


Verifica degli schema presenti


SET LINE 120

COLUMN MRC_NAME FORMAT A14

COLUMN COMP_ID FORMAT A20

COLUMN VERSION FORMAT A12

COLUMN STATUS FORMAT A9

COLUMN UPGRADED FORMAT A8

SELECT MRC_NAME, COMP_ID, OWNER, VERSION, STATUS, UPGRADED FROM

SCHEMA_VERSION_REGISTRY ORDER BY MRC_NAME, COMP_ID ;

Inizio Upgrade ODI alla 12.2.1.4.0


Settare i path della versione ODI 12.2.1.4.0 quando ci si collega alla macchina CLONE nel .bash_profile 

Upgrading Product Schemas Using the Upgrade Assistant

Start the Upgrade Assistant.

(UNIX) ./ua


select Individually Selected Schemas.


Save Response File

Verifica degli schema presenti upgradati

SET LINE 120

COLUMN MRC_NAME FORMAT A14

COLUMN COMP_ID FORMAT A20

COLUMN VERSION FORMAT A12

COLUMN STATUS FORMAT A9

COLUMN UPGRADED FORMAT A8

SELECT MRC_NAME, COMP_ID, OWNER, VERSION, STATUS, UPGRADED FROM

SCHEMA_VERSION_REGISTRY ORDER BY MRC_NAME, COMP_ID ;


OPPURE


SELECT MRC_NAME, COMP_ID, OWNER, VERSION, STATUS, UPGRADED

      FROM SCHEMA_VERSION_REGISTRY ORDER BY UPGRADED desc ;

Backing Up the Domain

Domain Location:

<ODIDOM>


(UNIX) cp -rf mydomain mydomain_backup

cp -rf <ODIDOM> <ODIDOM_20210630>


Reconfiguration Wizard Domain

Start Reconfig Assistant

(UNIX) ./reconfig.sh  -log=<inserire path e file di log> -log_priority=ALL


where -log=log_file is the absolute path of the log file you'd like to create for the

domain reconfiguration session. This can be helpful if you need to troubleshoot the

reconfiguration process.

The parameter -log_priority=ALL ensures that logs are logged in fine mode.


The Reconfiguration Progress screen displays the progress of the reconfiguration

process.

During this process:

• Domain information is extracted, saved, and updated.

• Schemas, scripts, and other such files that support your Fusion Middleware

products are updated.

When the progress bar shows 100%, click Next.


Upgrading Domain Component Configurations

Start the Upgrade Assistant.

(UNIX) ./ua


Select All Configurations Used By a Domain. The screen name changes to WebLogic Components.

Starting Servers and Processes

Domain Location:

        <ODIDOM>


Step 1: Start the Administration Server:

(UNIX) NEW_DOMAIN_HOME/bin/startWebLogic.sh

Step 2: Start Node Manager

(UNIX) NEW_DOMAIN_HOME/bin/startNodeManager.sh

Step 3: Start eventuali ORACLE Components

(UNIX) NEW_DOMAIN_HOME/bin/startComponent.sh component_name

Step 4: Start the Managed Servers - se necessario

(UNIX)NEW_DOMAIN_HOME/bin/startManagedWebLogic.sh managed_server_name

admin_url


Eseguire step 1 e 2 e poi collegarsi alla console per verifica servizi, processi e start managed server ODI:


https://<hostname_odi_clone>:7001/console

http://titappocm11lits:7001/console/login/LoginForm.jsp


LOG:

/u01/data/domains/ODI12INF/INF-ODIDOM_SVIL/servers/ODI_INF_SVIL_1/logs/ODI_INF_SVIL_1.log

/u01/data/domains/ODI12INF/INF-ODIDOM_SVIL/servers/ODI_INF_SVIL_1/logs/oracledi/odiagent.log 


CHECK domain with line command:


cd /u01/app/oracle/middleware/ODI12214INF/oracle_common/common/bin

[oracle@titappocm11lits bin]$ ./wlst.sh


Initializing WebLogic Scripting Tool (WLST) ...


Welcome to WebLogic Server Administration Scripting Shell


Type help() for help on available commands


wls:/offline> readDomain('/u01/data/domains/ODI12INF/INF-ODIDOM_SVIL')

wls:/offline/INF-ODIDOM_SVIL>ls ()

drw-   AppDeployment

drw-   CoherenceClusterSystemResource

drw-   Credential

drw-   EmbeddedLDAP

drw-   JDBCSystemResource

drw-   Keystore

drw-   Library

drw-   Machine

drw-   NMProperties

drw-   Security

drw-   SecurityConfiguration

drw-   Server

drw-   ServerTemplate

drw-   ShutdownClass

drw-   StartupClass

drw-   StartupGroupConfig

drw-   WLDFSystemResource


-rw-   Active                                        false

-rw-   AdminServerName                               AdminODI_INF_SVIL

-rw-   AdministrationMBeanAuditingEnabled            false

-rw-   AdministrationPort                            9002

-rw-   AdministrationPortEnabled                     false

-rw-   AdministrationProtocol                        t3s

-rw-   ArchiveConfigurationCount                     0

-rw-   AutoDeployForSubmodulesEnabled                true

-rw-   BatchJobsDataSourceJndiName                   null

-rw-   BatchJobsExecutorServiceName                  null

-rw-   ClusterConstraintsEnabled                     false

-rw-   ConfigBackupEnabled                           false

-rw-   ConfigurationAuditType                        null

-rw-   ConfigurationVersion                          12.2.1.4.0

-rw-   ConsoleContextPath                            console

-rw-   ConsoleEnabled                                true

-rw-   ConsoleExtensionDirectory                     console-ext

-rw-   DbPassiveMode                                 false

-rw-   DbPassiveModeGracePeriodSeconds               30

-rw-   DiagnosticContextCompatibilityModeEnabled     true

-rw-   DomainVersion                                 12.2.1.4.0

-rw-   EnableEeCompliantClassloadingForEmbeddedAdaptersfalse

-rw-   ExalogicOptimizationsEnabled                  false

-rw-   Id                                            0

-rw-   InternalAppsDeployOnDemandEnabled             true

-rw-   JavaServiceConsoleEnabled                     false

-rw-   JavaServiceEnabled                            false

-rw-   LastModificationTime                          0

-rw-   LogFormatCompatibilityEnabled                 false

-rw-   MaxConcurrentLongRunningRequests              50

-rw-   MaxConcurrentNewThreads                       50

-rw-   MsgIdPrefixCompatibilityEnabled               true

-rw-   Name                                          INF-ODIDOM_SVIL

-rw-   Notes                                         null

-rw-   OCMEnabled                                    true

-rw-   ParallelDeployApplicationModules              false

-rw-   ParallelDeployApplications                    false

-rw-   PartitionUriSpace                             /partitions

-rw-   ProductionModeEnabled                         false

-rw-   RootDirectory                                 null

-rw-   ServerMigrationHistorySize                    100

-rw-   ServiceMigrationHistorySize                   100

-rw-   SiteName                                      null

-rw-   Tag


CHECK UPGRADE

CHECK con connessione ODI tramite ODISTUDIO versione 12.2.1.4.0

1.      Check OdiAgent